Imagine biting into a juicy, sweet papaya you grew yourself, right on your patio. Sounds like a tropical dream, doesn't it? Well, it's more achievable than you think! With a little know-how, you can successfully grow papaya trees in pots , even if you don't live in a tropical paradise. Let's dive in and discover the secrets to nurturing your own potted papaya tree. Why Grow Papaya Trees in Pots? Growing papaya trees in containers, rather than directly in the ground, offers several advantages. First and foremost, it allows you to control the environment. Papayas thrive in warm temperatures and are sensitive to frost. By growing them in pots, you can easily move them indoors when the weather turns chilly. This is particularly beneficial for those of us living outside of tropical zones. Container growing also simplifies pest control. Keeping your papaya tree in a pot reduces its exposure to soil-borne pests and diseases. And because the tree is...
Imagine biting into a juicy, sweet papaya, grown right in your own backyard! The vibrant color and tropical flavor are incredibly satisfying. Growing your own papayas is easier than you might think, especially with the right guidance. This guide will walk you through the process of planting papaya seeds in India, ensuring you enjoy your homegrown papayas in no time. Let's embark on this rewarding journey!
Understanding Papaya Cultivation in India
India's diverse climate makes it suitable for papaya cultivation in many regions. Papayas thrive in warm, humid conditions, with temperatures ideally between 25°C and 35°C. However, choosing the right variety and providing proper care are crucial for success. Before diving into how to plant papaya seeds, let's understand the different factors influencing their growth in the Indian context. Understanding the basics of papaya cultivation in India will pave the way for successful growth, offering you a bountiful yield of sweet, delicious fruit.
Suitable Climatic Conditions for Papaya Seeds in India
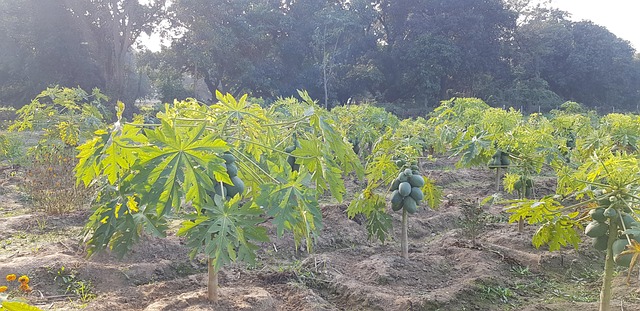
Papayas are tropical plants, meaning they require a warm climate to flourish. India's climate offers several regions perfect for this, including:
Coastal regions of Andhra Pradesh and Tamil Nadu.
Parts of Maharashtra, Karnataka, and Gujarat.
Eastern states like West Bengal and Assam.
Key climatic factors include:
- Temperature: Ideal temperature range is 25°C to 35°C.
- Rainfall: An average rainfall of 1500-2000 mm is beneficial, but well-drained soil is critical to avoid waterlogging.
- Humidity: High humidity levels promote healthy growth.
- Sunlight: Papayas need ample sunlight, ideally 6-8 hours per day.
Remember that extreme temperature fluctuations, especially frost, can be detrimental to papaya plants. Selecting a sheltered location or using protective measures during colder months is crucial in certain areas.
Choosing the Right Papaya Variety for India
Several papaya varieties thrive in India, each with unique characteristics. Some popular choices include:
- Pusa Dwarf: This variety is known for its dwarf stature, making it suitable for smaller gardens and container growing.
- Pusa Giant: A high-yielding variety with large fruits, ideal for commercial cultivation.
- Coorg Honey Dew: Prized for its excellent flavor and sweetness, this variety is popular in South India.
- Red Lady 786: A widely grown hybrid known for its disease resistance and high yield.
- Taiwan 785: Another popular hybrid variety, known for its consistent fruit quality.
When choosing a variety, consider factors such as your local climate, space availability, and desired fruit characteristics (size, sweetness, disease resistance). Local agricultural departments or nurseries can offer valuable advice on the best varieties for your specific region.
Step-by-Step Guide on How To Plant Papaya Seeds
Now, let’s move on to the practical steps of how to plant papaya seeds, from seed extraction to transplanting. This section provides a comprehensive guide to ensure your papaya seeds are planted correctly, resulting in healthy and thriving plants.
Extracting and Preparing Papaya Seeds
You can extract papaya seeds from a ripe papaya fruit. Here's how:
- Select a ripe, healthy papaya fruit.
- Cut the papaya in half lengthwise.
- Scoop out the seeds.
- Wash the seeds thoroughly to remove the pulp, as the pulp contains germination inhibitors. You can use a sieve or colander for this step.
- Dry the seeds in a shaded area for 2-3 days. Avoid direct sunlight, which can damage the seeds.
- Once the seeds are dry, store them in an airtight container in a cool, dry place until you are ready to plant.
Alternatively, you can purchase high-quality papaya seeds from reputable nurseries or online retailers. Buying from trusted sources ensures better germination rates and healthier plants.
Sowing Papaya Seeds: Germination Techniques
Proper germination is crucial for successful papaya cultivation. Here’s how to germinate papaya seeds:
Seed Germination:
Two methods are commonly used:
- Direct Sowing: Sow the seeds directly into the soil where you want the papaya plant to grow. This method is suitable for regions with consistently warm temperatures.
- Nursery Seedlings: Start the seeds in a nursery or seed tray for better control over the germination process.
Nursery Seedling Technique:
- Prepare a seed tray or small pots filled with a well-draining potting mix. A mixture of coco peat, vermicompost, and garden soil works well.
- Moisten the potting mix thoroughly.
- Sow the papaya seeds about 1/2 inch deep and 1 inch apart.
- Cover the seeds with a thin layer of potting mix.
- Gently water the seeds using a sprayer to avoid disturbing them.
- Cover the seed tray or pots with a transparent plastic sheet or lid to maintain humidity.
- Place the seed tray or pots in a warm location with indirect sunlight.
- Check the moisture level regularly and water as needed to keep the soil consistently moist but not waterlogged.
- The seeds should germinate in about 2-3 weeks.
You can also improve germination rates by soaking the seeds in water for 24 hours before sowing. This helps soften the seed coat and encourages faster sprouting. Ensure that you use fresh water and avoid prolonged soaking, which can lead to seed rot.
Transplanting Papaya Seedlings: A Crucial Step
Once the seedlings have developed 4-6 leaves and are about 6-8 inches tall, they are ready for transplanting. This is a critical stage, so handle the seedlings with care.
- Choose a sunny location with well-drained soil. Ensure the soil is fertile and rich in organic matter.
- Prepare the planting holes, spacing them about 6-8 feet apart. This spacing allows for adequate airflow and sunlight penetration as the plants mature.
- Carefully remove the seedlings from the seed tray or pots, being careful not to damage the roots.
- Plant the seedlings in the prepared holes, ensuring the top of the root ball is level with the surrounding soil.
- Backfill the holes with soil and gently firm around the base of the seedlings.
- Water the transplanted seedlings thoroughly.
- Mulch around the base of the plants with organic material such as straw or compost to help retain moisture and suppress weeds.
Transplanting is best done in the late afternoon or early evening to minimize stress on the seedlings. Providing shade for the first few days after transplanting can also help them adjust to their new environment.
Caring for Your Papaya Plants in India
Proper care is essential to ensure healthy growth and abundant fruit production. This section will cover essential aspects such as watering, fertilizing, pest control, and other management practices tailored to the Indian climate. Consistent care and attention will reward you with a plentiful harvest of delicious papayas.
Watering and Soil Management
Papaya plants require regular watering, especially during dry periods. However, it's crucial to avoid waterlogging, as this can lead to root rot. Here are some key points:
- Water deeply but infrequently, allowing the soil to dry slightly between watering sessions.
- Use well-draining soil to prevent water from accumulating around the roots.
- In regions with heavy rainfall, consider planting papayas on raised beds to improve drainage.
- Monitor the soil moisture levels regularly, especially during hot and dry months.
Soil management is equally important. Papayas thrive in well-drained, fertile soil with a p H between 6.0 and
6.5. Adding organic matter such as compost or well-rotted manure can improve soil structure, fertility, and water-holding capacity. Conducting a soil test can provide valuable insights into nutrient deficiencies and guide your fertilization strategy.
Fertilizing Your Papaya Plants for Optimal Growth
Papayas are heavy feeders and require regular fertilization to support their rapid growth and fruit production. A balanced fertilizer with nitrogen, phosphorus, and potassium (NPK) is essential. Here's a general fertilization schedule:
- At Planting: Apply a starter fertilizer high in phosphorus to promote root development.
- During Growth: Use a balanced NPK fertilizer every 2-3 months, following the manufacturer's instructions.
- During Fruiting: Increase the potassium content to enhance fruit quality and sweetness.
Organic fertilizers such as vermicompost, bone meal, and seaweed extract can also be used to supplement chemical fertilizers and improve soil health. Foliar feeding with micronutrient solutions can address specific nutrient deficiencies and promote overall plant health. Regular monitoring of plant growth and leaf color can help identify nutrient imbalances and adjust your fertilization regime accordingly.
Pest and Disease Control in Indian Conditions
Papaya plants are susceptible to various pests and diseases, especially in humid conditions. Common pests include:
- Aphids: These tiny insects suck sap from leaves, causing stunted growth and distorted foliage.
- Spider Mites: They create fine webs on leaves and cause yellowing and spotting.
- Fruit Flies: These pests lay eggs in developing fruits, causing them to rot.
Common diseases include:
- Root Rot: Caused by waterlogged soil and fungal pathogens.
- Papaya Ring Spot Virus (PRSV): A viral disease that causes ring-like spots on leaves and fruits, leading to reduced yield.
- Anthracnose: A fungal disease that causes dark lesions on fruits and leaves.
Integrated pest and disease management (IPM) strategies are essential for minimizing damage and promoting sustainable cultivation. These strategies include:
- Regularly inspect plants for signs of pests or diseases.
- Use insecticidal soaps or neem oil to control aphids and spider mites.
- Apply fruit fly traps or baits to reduce fruit fly populations.
- Ensure proper drainage to prevent root rot.
- Use disease-resistant varieties whenever possible.
- Practice crop rotation and sanitation to reduce disease inoculum in the soil.
In severe cases, chemical control may be necessary, but always use pesticides responsibly and follow the manufacturer's instructions. Consulting with local agricultural experts can provide valuable guidance on managing specific pest and disease problems in your region.
Harvesting and Enjoying Your Homegrown Papayas
After months of care and patience, the moment arrives when you can harvest your own papayas. Knowing when and how to harvest is crucial for ensuring the best flavor and quality. Let's look at how to harvest papayas.
When to Harvest Papayas
Papayas are typically ready for harvest 9-12 months after planting, depending on the variety and growing conditions. Here are some signs of ripeness:
- The fruit turns from green to yellow or orange, depending on the variety.
- The skin becomes slightly soft to the touch.
- A few drops of latex appear when the fruit stem is gently scratched.
It's best to harvest papayas when they are about 75-80% ripe, as they will continue to ripen after being picked. Harvesting slightly underripe fruits reduces the risk of damage during transportation and storage.
How to Harvest Papayas
Harvesting papayas carefully is important to avoid bruising or damaging the fruits. Here's how:
- Use a sharp knife or pruning shears to cut the fruit stem close to the branch.
- Handle the fruit gently to avoid bruising.
- Place the harvested papayas in a cool, shaded area to ripen.
Papayas can be stored at room temperature for several days or in the refrigerator for up to a week. Ripe papayas can be enjoyed fresh, used in smoothies, salads, desserts, or processed into jams and preserves. They are also rich in vitamins, minerals, and antioxidants, making them a healthy and delicious addition to your diet.
Gardening can be tough on the knees and back, so having the right tools can make a big difference. The KVR Upgraded Garden Kneeler and Seat is a fantastic addition to any gardener's toolkit, featuring a comfortable kneeling pad and sturdy seat for tending to your plants with ease. This foldable gardener stool with 2 tool pouches is a must-have! You can find it here: KVR Upgraded Garden Kneeler and Seat.
Growing papayas from seed in India is a rewarding experience that allows you to enjoy fresh, homegrown fruit. By following these tips and providing proper care, you can successfully cultivate papayas in your garden and savor the sweet taste of your own harvest. Happy gardening!