Imagine biting into a juicy, sweet papaya you grew yourself, right on your patio. Sounds like a tropical dream, doesn't it? Well, it's more achievable than you think! With a little know-how, you can successfully grow papaya trees in pots , even if you don't live in a tropical paradise. Let's dive in and discover the secrets to nurturing your own potted papaya tree. Why Grow Papaya Trees in Pots? Growing papaya trees in containers, rather than directly in the ground, offers several advantages. First and foremost, it allows you to control the environment. Papayas thrive in warm temperatures and are sensitive to frost. By growing them in pots, you can easily move them indoors when the weather turns chilly. This is particularly beneficial for those of us living outside of tropical zones. Container growing also simplifies pest control. Keeping your papaya tree in a pot reduces its exposure to soil-borne pests and diseases. And because the tree is...
Imagine biting into a juicy, sweet papaya, grown right on your own land. That dream can become a reality! Planting a papaya farm might seem daunting, but with the right knowledge and a little bit of elbow grease, you can be harvesting your own delicious fruits in no time. This guide breaks down everything you need to know, from seed selection to pest control, to help you establish a thriving papaya farm.
Planning Your Papaya Farm: Laying the Groundwork for Success
Before you even think about seeds, careful planning is essential for a successful papaya farm. This involves evaluating your land, considering the climate, and understanding market demands. Think of it as building a house; the foundation needs to be solid.
Choosing the Right Location and Climate for Papaya Farming
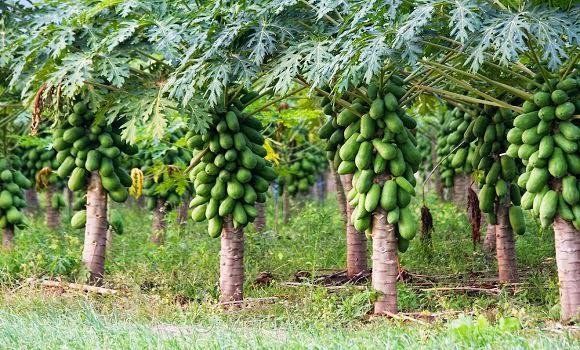
Papayas are tropical fruits and thrive in warm climates. They need plenty of sunshine and well-drained soil. Here’s a breakdown:
Climate: Ideal temperatures range from 21°C to 33°C (70°F to 91°F). Papayas are sensitive to frost and temperatures below 16°C (60°F) can stunt their growth. Sunlight: Papayas require at least 6-8 hours of direct sunlight daily. Soil:Well-drained soil is crucial. Papayas are susceptible to root rot if the soil remains waterlogged. Sandy loam soil with a p H between 6.0 and
6.5 is ideal. Clay soils should be avoided or heavily amended with organic matter to improve drainage. Water: While papayas need consistent moisture, they don't tolerate standing water. A good irrigation system is important, especially during dry periods. Wind Protection: Papaya trees are relatively shallow-rooted and can be damaged by strong winds. Consider planting windbreaks, such as rows of trees or shrubs, to protect your papaya orchard.
Consider these factors when selecting your farm location. If your region experiences occasional frosts, you might consider planting papaya trees in a protected area or using frost protection measures.
Selecting the Right Papaya Variety for Your Farm
Choosing the right papaya variety is crucial for optimizing your yield and meeting market demands. Different varieties have different characteristics, including fruit size, shape, taste, and disease resistance. Popular commercial papaya varieties include:
Red Lady: Known for its high yield, disease resistance, and sweet, reddish-orange flesh. It's a hermaphrodite variety, meaning each plant can produce fruit without needing a male pollinator. This is often a popular choice for commercial papaya farms. Sunrise Solo: A smaller variety with pinkish-red flesh and a delicate flavor. It's also a hermaphrodite variety. Tainung No. 1: A popular variety in Southeast Asia, known for its large fruit size and high yield. Golden: Known for its golden yellow flesh.
Research local market preferences and select a variety that is in demand. Consult with local agricultural extension officers or experienced papaya farmers for recommendations on the best varieties for your region and climate. Consider factors like disease resistance and shelf life when making your decision.
Planning the Layout and Spacing of Your Papaya Farm
Proper spacing is important for allowing adequate sunlight, air circulation, and room for growth. The recommended spacing depends on the variety and growing conditions. A common spacing is 2-3 meters (6.5-10 feet) between plants and 3-4 meters (10-13 feet) between rows. This translates to roughly 800 to 1,600 plants per hectare (320 to 640 plants per acre). A denser planting may result in more fruits per area in the first years, but it can reduce production later due to competition. It's a good idea to stagger plants to ensure maximum sunlight. A diagram illustrating this spacing can be extremely helpful for planning your orchard layout.
Preparing the Land for Planting Papaya
Land preparation is a critical step to ensure your papaya trees have a healthy start. Proper soil preparation improves drainage, aeration, and nutrient availability. This is all about setting the stage for your papaya plants to thrive.
Clearing and Tilling the Land
Begin by clearing the land of any existing vegetation, rocks, and debris. Tilling the soil to a depth of at least 30 cm (12 inches) helps to break up compacted soil and improve drainage. Adding organic matter, such as compost or manure, can further improve soil structure and fertility. Remove any large rocks or debris that could hinder root growth. The better the start, the quicker you can get your papaya farm underway.
Creating Planting Holes and Adding Amendments
Dig planting holes that are slightly larger than the root ball of the papaya seedlings. A common size is 60 cm (24 inches) wide and 60 cm (24 inches) deep. Before planting, amend the soil in the planting holes with organic matter, such as compost or well-rotted manure. You can also add a slow-release fertilizer to provide essential nutrients for the young plants. The specific type and amount of fertilizer will depend on the soil test results.
Here's an example amendment recipe per planting hole:
10 kg (22 lbs) of well-rotted manure or compost
200 g (7 oz) of superphosphate
100 g (3.5 oz) of potassium chloride
Mix the amendments thoroughly with the soil in the planting hole before planting the seedlings.
Planting Your Papaya Seedlings
Now for the exciting part! Planting the papaya seedlings is a delicate process that requires careful handling to minimize stress and ensure successful establishment. Think of them as fragile newborns needing gentle care.
Selecting Healthy Papaya Seedlings
Purchase seedlings from a reputable nursery to ensure they are healthy and disease-free. Choose seedlings that are 15-30 cm (6-12 inches) tall with a well-developed root system. Avoid seedlings that show signs of disease, pests, or stress. Ideally, you would want to choose seedlings that are already hardened off which means they have been exposed to sunlight to avoid shock when planting. Seedlings should also be certified free of papaya ringspot virus (PRSV).
The Planting Process: Step-by-Step Guide
Here's a step-by-step guide on how to plant your papaya seedlings:
1.Carefully remove the seedling from its container.*Gently loosen the root ball and remove any circling roots.
2.Place the seedling in the planting hole*ensuring the top of the root ball is level with the surrounding soil.
3.Backfill the planting hole with soil, gently firming it around the root ball.
4.Water the seedling thoroughly*to settle the soil and provide moisture.
5.Mulch around the base of the plantwith organic material, such as straw or wood chips, to help retain moisture, suppress weeds, and regulate soil temperature.
Avoid planting the seedlings too deep, as this can lead to root rot. Be careful not to damage the roots during planting. Protect young seedlings from strong winds and direct sunlight with temporary shade if necessary. Stake the seedling using sticks to avoid damage from the wind.
Caring for Your Papaya Farm:Nurturing Growth and Maximizing Yield
Once your papaya seedlings are planted, ongoing care is essential to ensure their healthy growth and maximize fruit production. This involves regular watering, fertilization, pest and disease management, and pruning.
Watering and Fertilizing Your Papaya Trees
Papayas need consistent moisture, especially during dry periods. Water deeply and regularly, but avoid overwatering, which can lead to root rot. A drip irrigation system is an efficient way to deliver water directly to the roots. Fertilize your papaya trees every 2-3 months with a balanced fertilizer, such as 14-14-14. The specific fertilizer requirements will depend on the soil test results and the age of the trees. Apply fertilizer around the drip line of the tree, avoiding direct contact with the trunk.
Here's a suggested fertilization schedule for papaya trees:
| Stage | Fertilizer | Application Rate | Frequency |
|---|---|---|---|
| ------------- | ------------------ | ----------------------------------- | ------------ |
| Planting | Starter fertilizer | Follow manufacturer's instructions | Once |
| 2-3 months | 14-14-14 | 100-200 g (3.5-7 oz) per tree | Every 2-3 months |
| 6-9 months | 14-14-14 | 200-400 g (7-14 oz) per tree | Every 2-3 months |
| 12+ months | 14-14-14 | 400-600 g (14-21 oz) per tree | Every 2-3 months |
Managing Pests and Diseases in Papaya Farming
Papayas are susceptible to various pests and diseases, including papaya ringspot virus (PRSV), spider mites, aphids, and fruit flies. Regularly inspect your trees for signs of pests or diseases. Implement integrated pest management (IPM) strategies, which combine cultural practices, biological control, and chemical control (as a last resort) to minimize pest and disease problems. Remove and destroy any infected plants to prevent the spread of diseases. Use appropriate insecticides and fungicides if necessary, following the manufacturer's instructions carefully. The most common disease ispapaya ringspot virus, and the most effective solution is prevention by purchasing seedlings that are certified PRSV-free.
Pruning and Thinning for Optimal Fruit Production
Papaya trees generally don't require extensive pruning. However, removing dead, diseased, or damaged leaves can improve air circulation and reduce the risk of disease. Thinning the fruit can also improve the size and quality of the remaining fruit. Remove any misshapen or damaged fruit. Some farmers will remove the first few flowers to encourage more vegetative growth before allowing fruit to set.
Harvesting and Post-Harvest Handling of Papayas
The time from planting to harvesting papayas varies depending on the variety and growing conditions, but it typically takes 9-12 months. Knowing when and how to harvest your papayas, along with proper post-harvest handling, ensures optimal fruit quality and extends shelf life.
Knowing When to Harvest Your Papayas
Papayas are ready to harvest when the skin starts to turn from green to yellow. The fruit should be firm but slightly yielding to the touch. The latex flow (milky sap) should also decrease when the fruit is scratched.
Harvesting Techniques and Post-Harvest Handling
Harvest papayas carefully by hand, using a sharp knife or pruning shears to cut the fruit from the stem. Leave a short piece of stem attached to the fruit to prevent spoilage. Avoid bruising or damaging the fruit during harvesting. After harvesting, clean the fruit with water and sort it according to size and quality. Store papayas in a cool, well-ventilated area to extend their shelf life. Handle with care at all times to avoid bruising the fruit. Bruised fruit ripen too quickly and have a shorter shelf life. For long-distance transport, the fruit can be packed in corrugated cardboard boxes.
By following these guidelines, you can successfully establish and manage a thriving papaya farm. Remember that patience, attention to detail, and a willingness to learn are key to achieving success. Good luck, and happy farming!