Imagine biting into a juicy, sweet papaya you grew yourself, right on your patio. Sounds like a tropical dream, doesn't it? Well, it's more achievable than you think! With a little know-how, you can successfully grow papaya trees in pots , even if you don't live in a tropical paradise. Let's dive in and discover the secrets to nurturing your own potted papaya tree. Why Grow Papaya Trees in Pots? Growing papaya trees in containers, rather than directly in the ground, offers several advantages. First and foremost, it allows you to control the environment. Papayas thrive in warm temperatures and are sensitive to frost. By growing them in pots, you can easily move them indoors when the weather turns chilly. This is particularly beneficial for those of us living outside of tropical zones. Container growing also simplifies pest control. Keeping your papaya tree in a pot reduces its exposure to soil-borne pests and diseases. And because the tree is...
Imagine biting into a juicy, sun-ripened papaya, bursting with tropical sweetness. What if you could grow your own right here in Australia? It might seem like a challenge, but with the right knowledge and a little patience, you absolutely can! Let's dive into the wonderful world of growing papayas from seed in the Australian climate.
Selecting the Right Papaya Variety for Growing Papaya in Australia
Choosing the right papaya variety is crucial for success, especially in Australia, where climate conditions can vary dramatically from tropical north to temperate south. Some varieties are more cold-hardy than others, while some are better suited for smaller gardens. Here's a breakdown to help you decide:
Popular Papaya Varieties for Australian Gardens:
- Red papaya: One of the most widely available varieties, known for its vibrant red flesh and sweet flavour. It usually grows well in most parts of Australia as long as there's enough sunlight and care during winter.
- Yellow papaya: A milder, subtly flavoured variety that's also quite popular. Yellow papayas are sometimes considered more resistant to certain diseases.
- Dwarf papayas: Ideal for smaller gardens or even container growing. These varieties, like 'Solo', produce smaller fruits and are more manageable in size.
Considering Your Climate When Growing Papaya From Seed:
Before you settle on a variety, consider your specific climate. Papayas thrive in warm, frost-free conditions. If you live in a cooler region, you'll need to provide extra protection during winter, such as growing them in a greenhouse or against a warm, north-facing wall. Here's a table showing some Australian climate zones and corresponding papaya recommendations:
| Climate Zone | Typical Regions | Papaya Variety Recommendations |
|---|---|---|
| Tropical (Zone 1) | Far North Queensland, Northern Territory | Most varieties, including Red, Yellow, and Dwarf. |
| Subtropical (Zone 2) | Southeast Queensland, Northern NSW | Red, Yellow, and potentially Dwarf varieties with some winter protection. |
| Warm Temperate (Zone 3) | Coastal NSW, Victoria | Dwarf varieties grown in sheltered locations with frost protection. Greenhouse recommended. |
| Cool Temperate (Zone 4) | Tasmania, Southern Victoria | Greenhouse growing is essential. Dwarf varieties are best. |
Remember, this is just a guideline. Microclimates within your garden can also play a significant role. A sheltered spot against a sunny wall can make a big difference! Speak to your local nursery for advice specific to your area.
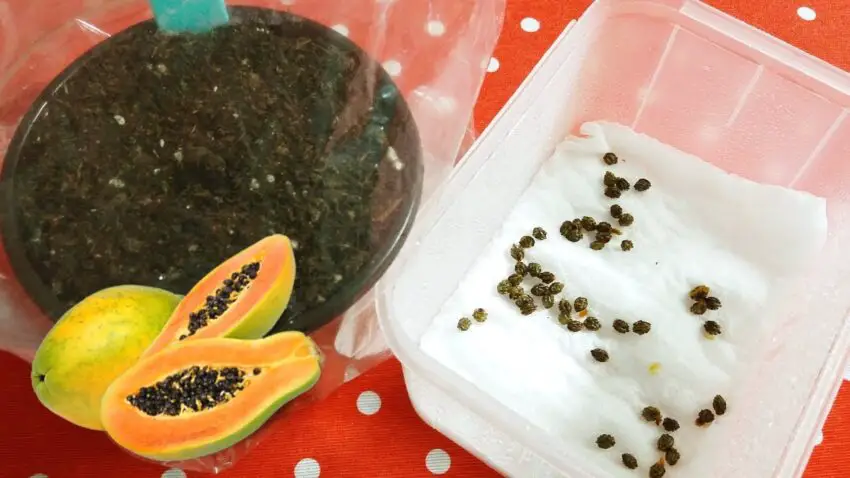
Extracting and Preparing Papaya Seeds for Planting in Australia
So, you've chosen your papaya variety. Now, let's get those seeds ready for planting! You can either purchase seeds from a reputable supplier or extract them from a ripe papaya fruit. If you're using store-bought seeds, make sure they're from a reliable source to ensure good germination rates.
Extracting Seeds from a Ripe Papaya:
This is a fun and rewarding way to start your papaya-growing journey. Here's how:
- Select a ripe papaya: Choose a fruit that's fully colored and slightly soft to the touch.
- Cut it open: Slice the papaya lengthwise and scoop out the seeds.
- Clean the seeds: Papaya seeds are coated in a gelatinous sac that inhibits germination. To remove this, rinse the seeds thoroughly under running water. You can rub them gently between your fingers to help remove the coating. Fermenting the seeds for a day or two in water can also help remove the coating.
- Dry the seeds: Spread the cleaned seeds on a paper towel and allow them to dry completely in a cool, well-ventilated place. This can take several days.
Preparing the Seeds for Germination:
While not strictly necessary, scarifying the seeds can improve germination rates. This involves gently scratching the surface of the seed to allow water to penetrate more easily. You can do this by lightly rubbing the seeds with sandpaper.
Another option is to soak the seeds in lukewarm water for 24 hours before planting. This will help soften the seed coat and encourage germination.
Important Tip: Papaya seeds can lose viability quickly, so it's best to plant them as soon as possible after extraction and preparation. If you can't plant them immediately, store them in an airtight container in a cool, dry place.
The Best Time to Plant Papaya Seeds in Australia for Successful Growing
Timing is everything when it comes to planting papaya seeds. Papayas need warmth to germinate and thrive. Planting at the right time can give your seedlings the best possible start.
Ideal Planting Season for Papaya Seeds in Australia:
The best time to plant papaya seeds in Australia is during the spring or early summer. This gives the seedlings plenty of time to establish themselves before the cooler months arrive. Here's a more detailed breakdown:
- Tropical Regions (Zone 1): You can plant papaya seeds year-round in tropical areas, as the climate is consistently warm.
- Subtropical Regions (Zone 2): Spring (September-November) is the ideal time to plant. You can also plant in early summer (December-January), but be sure to provide adequate water and protection from the hot sun.
- Warm Temperate Regions (Zone 3): Late spring (October-November) is the best time to plant. You may need to start the seeds indoors earlier in the season to give them a head start.
- Cool Temperate Regions (Zone 4): Starting the seeds indoors in early spring (September) is essential. You'll need to provide a warm, bright environment for germination and growth.
Considering Soil Temperature:
Papaya seeds germinate best when the soil temperature is between 25°C and 30°C (77°F and 86°F). You can use a soil thermometer to monitor the temperature. If the soil is too cold, use a heat mat to warm it up.
Indoor vs. Outdoor Planting:
In cooler regions, it's best to start the seeds indoors in a warm, sheltered environment. This will give them a head start and protect them from frost. Once the seedlings are large enough, you can transplant them outdoors after the last frost has passed.
Germinating Papaya Seeds: Step-by-Step Guide for Australian Gardeners
Germinating papaya seeds is a relatively straightforward process, but it requires attention to detail. Here's a step-by-step guide to help you get those seeds sprouting:
Step 1: Preparing the Seedling Mix
Use a well-draining seedling mix. A mixture of peat moss, perlite, and vermiculite works well. Avoid using garden soil, as it can be too heavy and may contain diseases.
Step 2: Sowing the Seeds
Fill small pots or seedling trays with the seedling mix. Moisten the mix thoroughly and allow excess water to drain. Sow the papaya seeds about 1 cm (0.4 inches) deep. Place one or two seeds in each pot or cell.
Step 3: Providing Warmth and Moisture
Cover the pots or trays with a plastic lid or plastic wrap to create a humid environment. Place them in a warm location, such as a sunny windowsill or a heated propagator. Maintain a consistent temperature of 25°C to 30°C (77°F to 86°F). Keep the soil consistently moist but not waterlogged. Mist the soil regularly to maintain humidity.
Step 4: Monitoring Germination
Papaya seeds typically germinate within 1-3 weeks. Once the seedlings emerge, remove the plastic lid or wrap to allow for better air circulation. Place the seedlings in a bright location but protect them from direct sunlight, which can scorch the leaves.
Step 5: Thinning Seedlings
If you planted two seeds per pot or cell, thin out the weaker seedling once they have developed a few leaves. This will allow the stronger seedling to thrive. Gently remove the weaker seedling by cutting it off at the base.
Case Study: A gardener in Melbourne, Victoria, struggled to germinate papaya seeds outdoors. By starting the seeds indoors in a heated propagator in late winter, he was able to achieve a much higher germination rate and produce healthy papaya seedlings ready for transplanting in spring.
Transplanting Papaya Seedlings into the Garden in Australia
Once your papaya seedlings have developed several true leaves and are about 15-20 cm (6-8 inches) tall, they are ready to be transplanted into the garden. This is a critical stage, so handle the seedlings with care.
Choosing the Right Location:
Papayas need a sunny, sheltered location with well-draining soil. Choose a spot that receives at least 6-8 hours of direct sunlight per day. Avoid areas that are prone to frost or strong winds.
Preparing the Soil:
Amend the soil with plenty of organic matter, such as compost or well-rotted manure. This will improve drainage and provide essential nutrients for the growing papaya plants. Ensure the soil p H is slightly acidic to neutral (p H 6.0-7.0).
Transplanting Procedure:
- Dig a hole: Dig a hole that is slightly larger than the root ball of the seedling.
- Carefully remove the seedling: Gently remove the seedling from the pot or tray, being careful not to damage the roots.
- Place the seedling in the hole: Position the seedling in the hole so that the top of the root ball is level with the surrounding soil.
- Fill the hole: Fill the hole with soil and gently firm it around the base of the seedling.
- Water thoroughly: Water the seedling thoroughly after transplanting.
Providing Support:
Papaya plants can be susceptible to wind damage, so it's a good idea to provide some support, especially in windy areas. You can use stakes or a trellis to support the plant as it grows.
Mulching:
Mulch around the base of the plant with organic matter, such as straw or wood chips. This will help retain moisture, suppress weeds, and regulate soil temperature.
Caring for Your Papaya Plants: Watering, Fertilizing, and Pest Control in Australia
Once your papaya plants are established, regular care is essential for healthy growth and fruit production. This includes proper watering, fertilizing, and pest control.
Watering:
Papayas need consistent moisture, especially during hot, dry weather. Water deeply and regularly, but avoid overwatering, which can lead to root rot. Check the soil moisture regularly and water when the top inch of soil feels dry.
Fertilizing:
Papayas are heavy feeders and benefit from regular fertilization. Use a balanced fertilizer that is rich in nitrogen, phosphorus, and potassium. Fertilize every 2-3 months during the growing season. You can also supplement with organic fertilizers, such as compost tea or seaweed extract.
Pest Control:
Papaya plants can be susceptible to various pests, including aphids, spider mites, and fruit flies. Monitor your plants regularly for signs of infestation and take action promptly. You can use organic pest control methods, such as insecticidal soap or neem oil, to control pests. Fruit fly traps can also be effective in reducing fruit fly damage.
Common Papaya Problems in Australia and How to Solve Them:
- Root Rot: Prevented by well-draining soil and avoiding overwatering. If it occurs, reduce watering and improve drainage.
- Yellowing Leaves: Can be caused by nutrient deficiency or overwatering. Check soil p H and nutrient levels. Fertilize appropriately.
- Lack of Fruit: Papayas are dioecious (male and female flowers on separate plants) or hermaphroditic (male and female flowers on the same plant). Ensure you have a mix of plants or a hermaphroditic variety to ensure pollination and fruit set.
Harvesting Your Homegrown Papayas: When and How in Australia
Harvesting your own papayas is the ultimate reward for your hard work and patience. Knowing when and how to harvest them is crucial for optimal flavour and texture.
When to Harvest:
Papayas are ready to harvest when they are partially green and partially yellow or orange. The skin should be slightly soft to the touch. You can also check the fruit for a slight change in color and a distinct aroma.
How to Harvest:
Use a sharp knife or secateurs to carefully cut the papaya from the plant. Leave a short stem attached to the fruit.
Ripening After Harvest:
Papayas will continue to ripen after they are harvested. You can place them in a paper bag with a banana or apple to speed up the ripening process. Avoid storing papayas in the refrigerator, as this can inhibit ripening and affect the flavour.
Enjoying Your Homegrown Papayas:
Enjoy your homegrown papayas fresh, in smoothies, salads, or desserts. They are a delicious and nutritious treat that you can be proud of growing yourself.
Growing papayas from seed in Australia can be a rewarding experience. With the right knowledge and care, you can enjoy your own homegrown tropical fruit, even in cooler climates. So, grab some seeds, get planting, and get ready to taste the sweetness of success!