Imagine biting into a juicy, sweet papaya you grew yourself, right on your patio. Sounds like a tropical dream, doesn't it? Well, it's more achievable than you think! With a little know-how, you can successfully grow papaya trees in pots , even if you don't live in a tropical paradise. Let's dive in and discover the secrets to nurturing your own potted papaya tree. Why Grow Papaya Trees in Pots? Growing papaya trees in containers, rather than directly in the ground, offers several advantages. First and foremost, it allows you to control the environment. Papayas thrive in warm temperatures and are sensitive to frost. By growing them in pots, you can easily move them indoors when the weather turns chilly. This is particularly beneficial for those of us living outside of tropical zones. Container growing also simplifies pest control. Keeping your papaya tree in a pot reduces its exposure to soil-borne pests and diseases. And because the tree is...
Ever dreamed of biting into a juicy, homegrown papaya, bursting with tropical sweetness? It might seem like a far-off fantasy, but growing a papaya tree from seed is surprisingly achievable, even for beginner gardeners. It's a rewarding journey that brings a touch of the tropics right to your backyard. Let's dive into the simple steps to start your own papaya adventure!
Embarking on Your Papaya Growing Journey: From Seed to Fruit
The journey of growing a papaya tree from seed is an exciting one. It starts with a tiny seed and culminates in a fruit-bearing tree that graces your garden with its presence. Understanding the process and providing the right conditions is key to success. This article will guide you through everything you need to know, from seed selection to nurturing your young papaya tree.
Selecting and Preparing Your Papaya Seeds
The first step in growing your own papaya tree from seed involves choosing the right seeds and preparing them for germination. Not all seeds are created equal, and proper preparation significantly increases your chances of success. Let's explore this in detail.
Choosing the Right Papaya Variety
Papaya varieties differ significantly in size, fruit taste, disease resistance, and climate adaptability. Before you even think about planting, consider your local climate and personal preferences. Some popular varieties include:
- 'Red Lady': A dwarf variety known for its early fruit production and resistance to papaya ringspot virus (PRSV).
- 'Solo Sunrise': A self-pollinating variety with sweet, pinkish-orange flesh.
- 'Maradol': A larger variety with sweet, reddish-orange flesh, commonly found in supermarkets.
- 'Mexican Red/Yellow': These are not varieties per se, but rather refer to larger papayas that are common in Mexico, where the flesh can be red or yellow depending on the plant. These are delicious and generally grown well in warmer areas.
Consider these factors when choosing your seeds:
- Climate: Select a variety that's known to thrive in your region. If you live in a cooler climate, a dwarf variety that can be grown in a container may be a better choice.
- Taste Preference: Do you prefer a sweeter, more intensely flavored papaya, or a milder one? Read descriptions of different varieties to find one that suits your taste.
- Disease Resistance: PRSV can be a major problem for papaya growers. Choosing a resistant variety can save you a lot of headaches.
- Space: Consider how much space you have available. Dwarf varieties are ideal for smaller gardens or container growing.
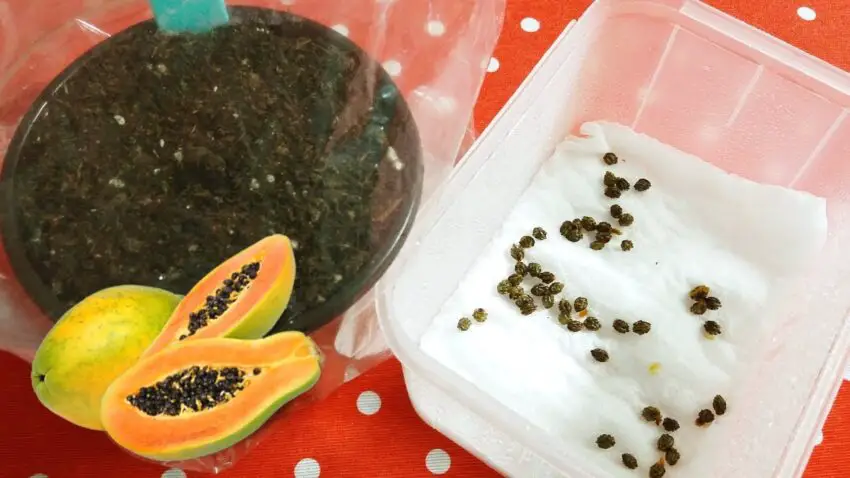
Extracting and Preparing Papaya Seeds
You can obtain papaya seeds from a ripe papaya fruit. Choose a fruit that's fully ripe and free from blemishes. Here's how to extract and prepare the seeds:
- Cut Open the Papaya: Carefully slice the papaya in half lengthwise.
- Remove the Seeds: Use a spoon to scoop out the seeds. They will be covered in a gelatinous sac.
- Clean the Seeds: This is a crucial step! The gelatinous sac contains germination inhibitors. To remove it, place the seeds in a sieve and rinse them thoroughly under running water. Rub the seeds gently to remove any remaining pulp.
- Dry the Seeds: Spread the cleaned seeds on a paper towel and allow them to dry completely in a cool, well-ventilated place. This may take several days. Make sure they are completely dry before storing them.
Some people soak the seeds in a diluted hydrogen peroxide solution (about 3% concentration) for a few minutes after cleaning. This can help to further break down any remaining germination inhibitors and reduce the risk of fungal growth.
Germinating Papaya Seeds: Creating the Ideal Environment
Once you have your prepared seeds, the next step is germination. Creating the right environment is crucial for successful germination. Papaya seeds need warmth, moisture, and proper drainage.
Choosing a Germination Method
There are several methods you can use to germinate papaya seeds. Here are two popular options:
- Direct Sowing: This involves planting the seeds directly into small pots or seed trays filled with well-draining potting mix.
- Paper Towel Method: This involves placing the seeds between moist paper towels and keeping them in a warm, dark place until they sprout.
The paper towel method allows you to monitor germination progress closely. However, direct sowing is often simpler and less likely to disturb the seedlings' roots when transplanting.
Step-by-Step Guide to Germinating Papaya Seeds
Here's a detailed guide to direct sowing, which is considered the more straightforward approach:
- Prepare Your Pots: Fill small pots (about 3-4 inches in diameter) with a well-draining potting mix. A mixture of peat moss, perlite, and vermiculite works well. You can also use seed starting mix.
- Sow the Seeds: Plant 2-3 seeds per pot, about 1/2 inch deep. Planting multiple seeds increases the chances of at least one germinating.
- Water Gently: Water the pots gently to moisten the soil. Avoid overwatering, as this can lead to rot.
- Create a Humid Environment: Cover the pots with plastic wrap or a clear plastic lid to create a humid environment. This will help to retain moisture and promote germination.
- Provide Warmth: Place the pots in a warm location with a temperature of around 70-85°F (21-29°C). A heat mat can be helpful if your home is cooler.
- Monitor Germination: Check the pots daily for signs of germination. Papaya seeds typically germinate within 1-3 weeks.
- Remove Cover: Once the seeds have germinated, remove the plastic wrap or lid to allow for proper ventilation.
Here's a quick comparison of direct sowing and the paper towel method:
| Feature | Direct Sowing | Paper Towel Method |
|---|---|---|
| ------------------- | ------------------------- | -------------------------- |
| Ease of Use | Simpler | Slightly More Complex |
| Monitoring | Less direct | Easier to Monitor |
| Root Disturbance | Less During Transplant | More During Transplant |
| Space Required | More Space initially | Less Space Initially |
Optimizing Conditions for Successful Germination of Papaya Seeds
Consistent moisture and warmth are key to successful papaya seed germination. Avoid letting the soil dry out completely, but also avoid overwatering, which can lead to fungal diseases. A heat mat can be invaluable, especially in cooler climates. Good air circulation is also vital to prevent fungal problems once the seedlings emerge. Keep the environment consistently moist by misting the soil with water daily. A spray bottle works well for this purpose.
Nurturing Your Papaya Seedlings: From Sprout to Sapling
Once your papaya seeds have germinated, the real fun begins! Nurturing your seedlings from sprout to sapling requires consistent care and attention. Providing the right light, water, and nutrients is essential for healthy growth. It’s also important to note that you'll be looking to transplant the seedlings individually into larger pots once they reach about 4 inches. This allows the roots to grow more fully without being constrained.
Providing Adequate Light for Papaya Seedlings
Papaya seedlings need plenty of bright, indirect light. A sunny windowsill facing east or south is ideal. If you don't have enough natural light, you can use grow lights. Artificial grow lights are especially beneficial during winter months or in climates with limited sunlight. They ensure your seedlings receive the necessary light intensity for proper development.
Watering and Fertilizing Your Growing Papaya Plants
Water your seedlings regularly, but avoid overwatering. The soil should be moist but not soggy. Allow the top inch of soil to dry out between waterings. Overwatering can lead to root rot, a common problem for papaya seedlings. Fertilize your seedlings every 2-3 weeks with a balanced liquid fertilizer diluted to half strength. A fertilizer with an N-P-K ratio of 10-10-10 is a good choice.
Protecting Your Papaya Seedlings from Pests and Diseases
Papaya seedlings are susceptible to various pests and diseases, including aphids, spider mites, and fungal infections. Inspect your seedlings regularly for signs of infestation or disease. If you notice any problems, take action immediately.
- Aphids: These small, sap-sucking insects can weaken your seedlings. Wash them off with a strong stream of water or use insecticidal soap.
- Spider Mites: These tiny pests create webs on the leaves and can cause them to turn yellow and drop off. Increase humidity around the plants and use miticide if necessary.
- Fungal Infections: These can cause damping-off (seedlings collapsing and dying) or leaf spots. Ensure good air circulation and avoid overwatering. Use a fungicide if necessary.
Proper sanitation is crucial for preventing diseases. Always use clean pots and potting mix. Avoid overcrowding the seedlings. Remove any dead or dying leaves promptly. Consider using organic pest control methods whenever possible to minimize the risk of harming beneficial insects or contaminating the environment.
Transplanting Your Papaya Sapling: Choosing the Right Location
Once your papaya sapling has grown to about 6-8 inches tall and has several sets of true leaves, it's time to transplant it into a larger container or into the ground. This is a critical step that can significantly impact the tree's future growth and fruit production.
Selecting the Ideal Location
Papayas need plenty of sunlight and well-draining soil. Choose a location that receives at least 6-8 hours of direct sunlight per day. The soil should be rich in organic matter and have good drainage. Avoid planting papayas in areas where the soil is constantly wet or prone to flooding.
Also consider these factors when choosing a location:
- Wind Protection: Papaya trees are susceptible to wind damage, especially when young. Choose a location that's sheltered from strong winds.
- Space: Papaya trees can grow quite large, so make sure you have enough space for them to mature.
- Soil p H: Papayas prefer a slightly acidic soil p H (around 6.0-6.5). You can test your soil p H using a soil testing kit.
Step-by-Step Guide to Transplanting Your Papaya Tree Seedling
- Prepare the Planting Hole: Dig a hole that's twice as wide and as deep as the root ball of the sapling.
- Amend the Soil: Mix compost or other organic matter into the soil that you removed from the hole. This will improve drainage and fertility.
- Carefully Remove the Sapling from its Container: Gently loosen the soil around the roots and carefully lift the sapling out of the container. Avoid damaging the roots.
- Place the Sapling in the Hole: Position the sapling in the hole so that the top of the root ball is level with the ground.
- Fill the Hole with Soil: Backfill the hole with the amended soil, gently tamping it down around the roots.
- Water Thoroughly: Water the sapling thoroughly after planting.
- Mulch: Apply a layer of mulch around the base of the tree to help retain moisture and suppress weeds.
After transplanting, water the sapling regularly, especially during dry periods. Fertilize it every 2-3 months with a balanced fertilizer. Protect it from pests and diseases.
Caring for Your Mature Papaya Tree: Maximizing Fruit Production
Once your papaya tree is established, it will require ongoing care to ensure healthy growth and abundant fruit production. This includes proper watering, fertilization, pruning, and pest and disease management.
Watering and Fertilizing a Papaya Plant
Water deeply and regularly, especially during dry spells. Papayas need consistent moisture, but avoid overwatering, which can lead to root rot. Fertilize every 2-3 months with a balanced fertilizer. You can also apply organic fertilizers such as compost or manure. Consider soil testing from time to time to ensure that it receives the necessary nutrients.
Pruning and Training for Papaya Trees
Papaya trees don't require extensive pruning, but removing dead or damaged leaves and branches can improve air circulation and prevent disease. You can also prune the tree to control its size and shape. Remove any suckers (shoots that grow from the base of the tree) as they can compete with the main stem for nutrients.
Protecting Papaya Trees from Pests and Diseases
Monitor your papaya tree regularly for signs of pests and diseases. Common pests include aphids, spider mites, whiteflies, and papaya fruit flies. Common diseases include papaya ringspot virus (PRSV), anthracnose, and root rot. Use appropriate control measures to prevent and treat these problems. Consider using netting or other physical barriers to protect the fruit from pests.
Did you know that a helpful item for maintaining your garden is the KVR Upgraded Garden Kneeler and Seat with Thicken & Widen Soft Kneeling Pad? This heavy-duty foldable gardener stool with 2 tool pouches can make tending to your papaya tree much more comfortable. This gardening stool is a fantastic gift for women, moms, and men. You can find it here: https://amzn.to/4mhl Mx I
Harvesting Your Papaya: Enjoying the Fruits of Your Labor
Papayas typically begin to bear fruit within 6-9 months after transplanting. The fruit is ripe when it turns from green to yellow or orange and is slightly soft to the touch. Harvest the fruit carefully to avoid bruising it. Cut the fruit from the tree with a sharp knife or pruners, leaving a short stem attached. Enjoy the delicious, homegrown papaya!
Knowing When Your Papaya is Ready
Determining when your papaya is ready to harvest is a crucial part of the growing process. There are a few key indicators to look for:
- Color Change: The skin of the papaya will change from green to yellow or orange, depending on the variety.
- Softness: The fruit will be slightly soft to the touch. It should yield slightly when gently squeezed.
- Aroma: A ripe papaya will have a sweet, fruity aroma.
Step-by-Step Guide to Harvesting
- Gently Assess: Gently squeeze the papaya to check for ripeness.
- Use a Sharp Knife: Use a sharp knife or pruners to cut the fruit from the tree.
- Leave a Short Stem: Leave a short stem (about 1-2 inches) attached to the fruit. This will help to prevent spoilage.
- Handle Carefully: Handle the fruit carefully to avoid bruising it.
- Store Properly: Store the harvested papayas in a cool, dry place. They will continue to ripen off the tree.
Growing your own papaya tree from seed is a rewarding experience that brings a touch of the tropics to your garden. With the right care and attention, you can enjoy delicious, homegrown papayas for years to come. So, what are you waiting for? Get started today!