Imagine biting into a juicy, sweet papaya you grew yourself, right on your patio. Sounds like a tropical dream, doesn't it? Well, it's more achievable than you think! With a little know-how, you can successfully grow papaya trees in pots , even if you don't live in a tropical paradise. Let's dive in and discover the secrets to nurturing your own potted papaya tree. Why Grow Papaya Trees in Pots? Growing papaya trees in containers, rather than directly in the ground, offers several advantages. First and foremost, it allows you to control the environment. Papayas thrive in warm temperatures and are sensitive to frost. By growing them in pots, you can easily move them indoors when the weather turns chilly. This is particularly beneficial for those of us living outside of tropical zones. Container growing also simplifies pest control. Keeping your papaya tree in a pot reduces its exposure to soil-borne pests and diseases. And because the tree is...
Imagine biting into a juicy, sweet papaya, grown right in your own backyard! It's more attainable than you might think. Growing papayas from seed is a rewarding experience, allowing you to nurture a tropical delight from the very beginning. This comprehensive guide will walk you through every step of the process, ensuring you have everything you need to successfully cultivate your own papaya tree and enjoy the fruits of your labor.
Starting Your Papaya Journey: A Seed-to-Fruit Guide
Why Grow Papayas From Seed?
While you can purchase papaya seedlings, growing papayas from seed offers several advantages. Firstly, it's often more cost-effective. A packet of papaya seeds is significantly cheaper than buying established plants. Secondly, you have a wider selection of papaya varieties to choose from when starting from seed. Nurseries may only carry a limited number of cultivars, but seed companies offer a much broader range. Finally, the experience of nurturing a plant from seed to fruit is incredibly satisfying. Watching a tiny seed sprout and grow into a fruit-bearing tree is a testament to your gardening skills and a source of immense pride.
Growing your own papayas from seeds lets you select the strongest seedlings for transplanting. You are able to observe which ones are the most vigorous and resilient, increasing your chances of success when the plants go into the garden.
Step-by-Step: How To Grow Papaya Plants From Seed
1. Selecting and Preparing Papaya Seeds
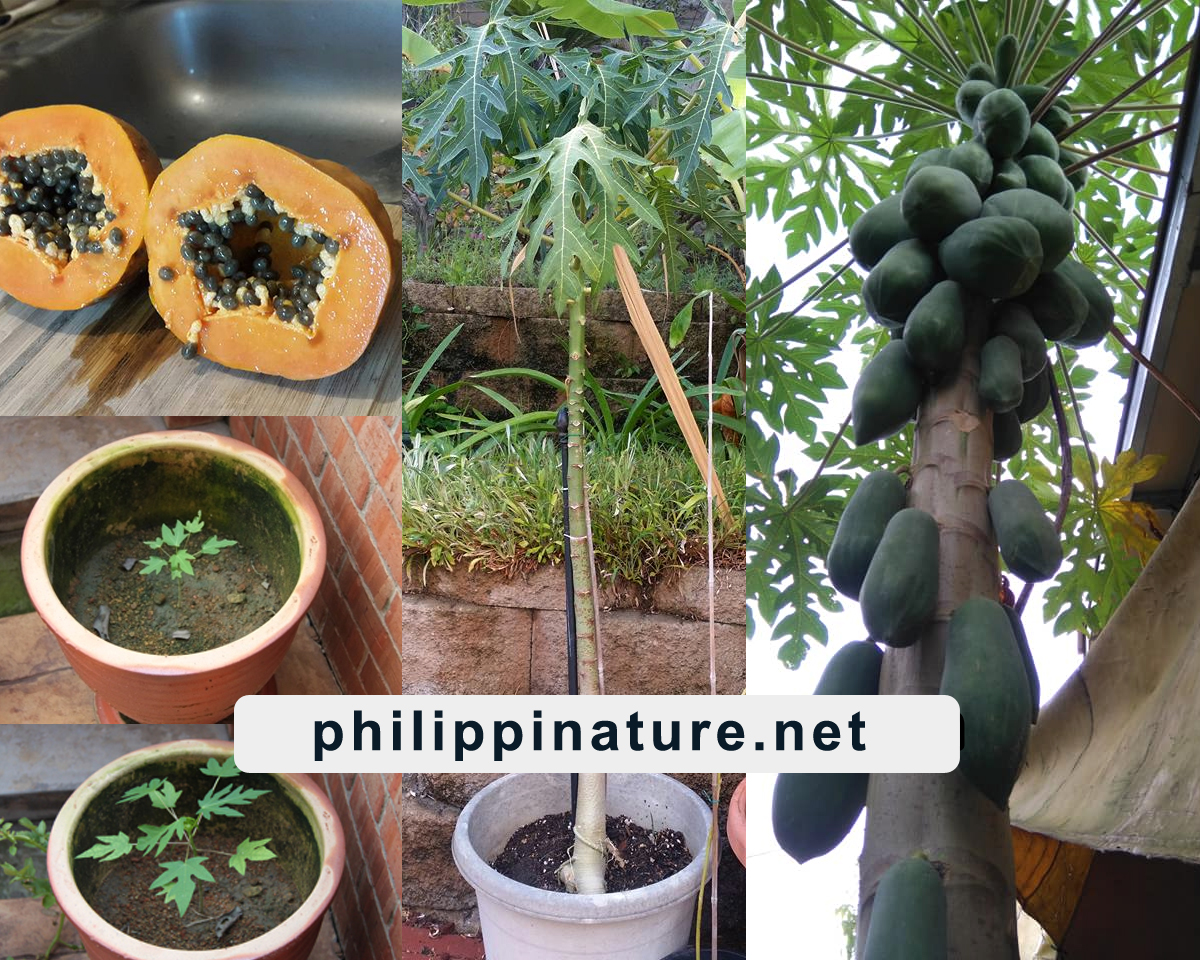
The first step in growing papaya from seed is sourcing viable seeds. You can obtain seeds from a mature, ripe papaya fruit, preferably one you enjoyed eating! Look for papayas with vibrant color and a sweet aroma. To extract the seeds, simply cut open the fruit and scoop out the black seeds surrounded by a gelatinous coating. Rinse the seeds thoroughly under running water to remove this coating, as it contains germination inhibitors.
Once cleaned, spread the seeds on a paper towel to dry for a few days. Allow them to dry completely in a cool, dark place. Ensure good airflow to prevent mold growth. Properly dried seeds can be stored in an airtight container in the refrigerator for several months until you're ready to plant.
It's a good practice to gather the seeds from several different papayas in order to ensure genetic diversity.
Here's a quick checklist for preparing your papaya seeds:
- Select a ripe papaya fruit.
- Scoop out the seeds and rinse thoroughly.
- Dry the seeds completely.
- Store in an airtight container in the refrigerator (optional).
2. Germinating Papaya Seeds
Papaya seeds require warmth and moisture to germinate successfully. You can germinate them directly in small pots or use a paper towel method. For the paper towel method, dampen a paper towel and place the seeds on one half, then fold the other half over. Place the paper towel in a plastic bag or container to maintain humidity, and keep it in a warm location, ideally between 70-85°F (21-29°C). Check the paper towel regularly and mist it with water if it starts to dry out. Germination typically occurs within 1-3 weeks.
Alternatively, you can sow the seeds directly into small pots filled with a well-draining seed-starting mix. Plant the seeds about ½ inch deep and water gently. Cover the pots with plastic wrap to retain moisture and place them in a warm location. Once the seedlings emerge, remove the plastic wrap and provide them with plenty of light.
A heat mat is highly recommended to help maintain the ideal soil temperature for seed germination. If you live in a cooler climate, a heat mat will be a game-changer.
3. Transplanting Papaya Seedlings
Once your papaya seedlings have developed a few sets of true leaves (typically 4-6 weeks after germination), they're ready to be transplanted into larger pots. Choose pots that are at least 6 inches in diameter and fill them with a well-draining potting mix. Gently remove the seedlings from their germination containers, being careful not to damage the roots. Plant each seedling in its own pot, ensuring that the top of the root ball is level with the soil surface. Water thoroughly after transplanting.
Continue to provide your papaya seedlings with plenty of sunlight and water regularly. Allow the soil to dry slightly between waterings to prevent root rot. Fertilize them every 2-4 weeks with a balanced liquid fertilizer, following the manufacturer's instructions.
Before transplanting into the garden, you will want to harden off the seedlings by slowly exposing them to outdoor conditions for a week or two. This helps them acclimate to the sun, wind, and temperature fluctuations, reducing transplant shock.
4. Choosing the Right Location and Soil
Papayas thrive in warm, sunny locations with well-draining soil. Choose a spot in your garden that receives at least 6-8 hours of direct sunlight per day. Papayas are sensitive to frost, so select a location that is protected from cold winds and where temperatures rarely drop below 32°F (0°C). If you live in an area with frequent frosts, consider growing your papaya in a large container that can be moved indoors during the winter months.
The ideal soil for papayas is well-draining, fertile, and slightly acidic (p H 6.0-6.5). If your soil is heavy clay, amend it with plenty of organic matter, such as compost or well-rotted manure, to improve drainage. You can also create raised beds to further enhance drainage. Good drainage is crucial, as papayas are highly susceptible to root rot in waterlogged soils.
Consider the mature size of the papaya tree when choosing a location. Papayas can grow quite large (up to 20 feet tall), so ensure that they have enough space to grow without crowding other plants.
5. Planting Papaya Trees in the Garden
Once your papaya seedlings are about 1-2 feet tall and the risk of frost has passed, they're ready to be planted in the garden. Dig a hole that is twice as wide and just as deep as the root ball of the seedling. Gently remove the seedling from its pot and loosen any circling roots. Place the seedling in the hole, ensuring that the top of the root ball is level with the soil surface. Backfill the hole with soil and gently firm it around the base of the plant. Water thoroughly after planting.
Space papaya trees at least 8-10 feet apart to allow for adequate air circulation and sunlight penetration. Mulch around the base of the trees with organic matter, such as straw or wood chips, to help retain moisture, suppress weeds, and regulate soil temperature.
If you're planting multiple papaya trees, it's a good idea to plant several seedlings close together. This is because papayas can be male, female, or hermaphrodite (having both male and female reproductive organs). Only female and hermaphrodite plants produce fruit, so planting several seedlings increases your chances of getting fruit-bearing trees. Once the trees start to flower, you can identify the sex of each plant and remove any male plants.
6. Caring for Your Papaya Trees
Papayas require regular watering, especially during dry periods. Water deeply and allow the soil to dry slightly between waterings. Avoid overwatering, as this can lead to root rot. Fertilize your papaya trees every 2-4 months with a balanced fertilizer, following the manufacturer's instructions. Choose a fertilizer that is specifically formulated for fruit trees or use a general-purpose fertilizer with a higher potassium content.
Pruning is generally not necessary for papayas, but you can remove any dead, damaged, or diseased leaves or branches. You may also want to thin out the fruit if the tree is producing too many, as this can improve the size and quality of the remaining fruit.
Protect your papaya trees from pests and diseases by monitoring them regularly and taking appropriate action if problems arise. Common papaya pests include aphids, spider mites, and fruit flies. Diseases such as root rot, powdery mildew, and anthracnose can also affect papayas. Consult with your local agricultural extension office or a certified arborist for advice on managing pests and diseases in your area.
Here are some key aspects of ongoing care to remember:
- Regular watering, especially during dry periods.
- Fertilizing every 2-4 months.
- Monitoring for and addressing pests and diseases.
7. Harvesting Papayas
Papayas typically take 6-9 months to mature after flowering. The fruit is ready to harvest when it turns from green to yellow or orange and is slightly soft to the touch. Gently twist the fruit off the tree. If the fruit is difficult to remove, it's not quite ripe yet. You can also leave the fruit on the tree until it is fully ripe, but be sure to protect it from birds and other pests.
Ripe papayas can be stored at room temperature for a few days or in the refrigerator for up to a week. Enjoy them fresh, in smoothies, salads, or desserts.
Remember that fruits ripen quicker when placed in a paper bag, because it traps the ethene, a gas that ripens fruit.
Troubleshooting Common Problems When Growing Papayas from Seed
Growing papayas from seed can be challenging, and you may encounter some common problems along the way. Here are some tips for troubleshooting these issues:
- Poor germination: Ensure that you are using fresh, viable seeds and providing them with adequate warmth and moisture. Use a heat mat to maintain the ideal soil temperature.
- Seedling damping-off: Damping-off is a fungal disease that can kill young seedlings. Prevent damping-off by using a sterile seed-starting mix, avoiding overwatering, and providing good air circulation.
- Yellowing leaves: Yellowing leaves can be caused by nutrient deficiencies, overwatering, or pests. Check the soil p H and nutrient levels and adjust accordingly. Ensure that the soil is well-draining and that the plants are not being overwatered. Inspect the plants for pests and take appropriate action if necessary.
- Lack of fruit production: As mentioned earlier, only female and hermaphrodite papaya trees produce fruit. If you have a male tree, it will not produce fruit. You can identify the sex of the tree by examining the flowers. Female flowers have a large ovary at the base, while male flowers have long, slender stalks. Hermaphrodite flowers have both male and female reproductive organs.
By carefully monitoring your plants and addressing any problems promptly, you can increase your chances of success and enjoy a bountiful harvest of delicious papayas.
Gardening can sometimes be tough on the knees and back, so why not make it a little easier? Consider the KVR Upgraded Garden Kneeler and Seat with Thicken & Widen Soft Kneeling Pad,Heavy Duty Foldable Gardener Stool with 2 Tool Pouches. This versatile gardening stool and kneeler will help you stay comfortable while tending to your precious plants and seedlings. You can find this convenient gardening aid right here: https://amzn.to/4mhl Mx I. A useful gardening stool is a great way to take some strain off of your joints.
Conclusion: Enjoy the Fruits of Your Labor
Growing papayas from seed requires patience and attention to detail, but the rewards are well worth the effort. By following the steps outlined in this guide, you can successfully cultivate your own papaya tree and enjoy the delicious, tropical fruit it produces. From selecting the right seeds to providing the proper care, every step of the process contributes to the overall success of your papaya-growing endeavor. So, get started today and experience the satisfaction of growing your own papayas from seed!