Imagine biting into a juicy, sweet papaya you grew yourself, right on your patio. Sounds like a tropical dream, doesn't it? Well, it's more achievable than you think! With a little know-how, you can successfully grow papaya trees in pots , even if you don't live in a tropical paradise. Let's dive in and discover the secrets to nurturing your own potted papaya tree. Why Grow Papaya Trees in Pots? Growing papaya trees in containers, rather than directly in the ground, offers several advantages. First and foremost, it allows you to control the environment. Papayas thrive in warm temperatures and are sensitive to frost. By growing them in pots, you can easily move them indoors when the weather turns chilly. This is particularly beneficial for those of us living outside of tropical zones. Container growing also simplifies pest control. Keeping your papaya tree in a pot reduces its exposure to soil-borne pests and diseases. And because the tree is...
Imagine turning a single papaya into a whole grove! Rooting papaya cuttings isn't just a gardening project; it's an adventure in propagation, a way to multiply your favorite fruit trees, and a fascinating exploration of plant life. It might seem a little tricky at first, but with the right knowledge and a touch of patience, you'll be well on your way to creating new papaya plants from cuttings.
How to Root Papaya Cuttings: A Step-by-Step Guide
Understanding Papaya Propagation
Before we dive into the nitty-gritty of rooting papaya cuttings, let's understand why this method is used and what makes it work. Papaya, scientifically known as Carica papaya, is typically grown from seeds. However, growing papayas from seed can result in variable fruit quality and characteristics, so you can’t guarantee whether you’ll get a female, male or hermaphrodite plant from seed (female plants need male plants to pollinate them in order to create fruit, so you may end up with a useless tree). Rooting cuttings allows you to create clones of a parent plant, ensuring you get the same desirable traits – taste, size, disease resistance, and especially the sex of the tree. This is especially important when you have a papaya variety you absolutely love.
While seed propagation is often easier, rooting papaya cuttings allows you to bypass the juvenile phase of growth, which can take a year or more before the plant begins fruiting. Cuttings, having already been part of a mature plant, can often produce fruit sooner. Keep in mind that rooting papaya cuttings can be more challenging than rooting cuttings of some other plants. Success rates can vary, and it requires careful attention to detail. But don't let that deter you – the reward of multiplying your favorite papaya tree is well worth the effort!
Selecting the Right Papaya Cuttings
Choosing the right cutting is paramount to success. Here’s what to look for:
- Source: Take cuttings from a healthy, mature papaya plant that produces excellent fruit.
- Timing: The best time to take cuttings is during the active growing season, typically in spring or early summer.
- Stem Selection: Look for stems that are about 12-18 inches long and at least ½ inch in diameter. Choose semi-hardwood cuttings, meaning they are not too soft and green, nor too hard and woody.
- Nodes: Ensure the cutting has several leaf nodes (the points where leaves emerge from the stem). These are where roots will develop.
- Disease-Free: Avoid stems with any signs of disease or pest infestation.
A crucial factor is the maturity of the cutting. Very young, soft stems are prone to rotting, while overly mature, woody stems can be slow to root. The "sweet spot" is a semi-hardwood stem that's firm but still has some flexibility. Think of it as a stem that's neither bendy like a fresh shoot nor brittle like an old branch. You can use a sharp, clean knife or pruning shears to take the cuttings. Make a clean, angled cut just below a node to encourage root development.
Preparing the Papaya Cuttings for Rooting
Proper preparation is key to encouraging root growth. Follow these steps to optimize your cuttings:
- Remove Lower Leaves: Strip off the leaves from the lower half of the cutting to prevent them from rotting in the soil or rooting medium. Leave a few leaves at the top for photosynthesis.
- Reduce Leaf Size: Cut the remaining leaves in half to reduce water loss through transpiration. This helps the cutting conserve energy for root development.
- Wound the Base: Gently scrape or score the lower inch of the cutting with a knife. This encourages callus formation, which is a precursor to root development.
- Rooting Hormone: Dip the base of the cutting in a rooting hormone powder or liquid. Rooting hormones contain auxins, which stimulate root growth. Follow the product instructions for application.
Wounding the base of the cutting is a subtle but effective technique. By creating small abrasions, you're essentially signaling to the plant to initiate a repair response, which includes the formation of new cells and, hopefully, roots. The rooting hormone enhances this process by providing a concentrated dose of auxins, the plant hormones responsible for cell division and root differentiation. Note that while the use of rooting hormone isn't absolutely necessary, it significantly increases the chances of successful rooting, especially with a plant like papaya that can be more challenging.
Rooting Medium and Planting Techniques
The rooting medium provides support, moisture, and aeration for the developing roots. Here are some suitable options:
- Well-Draining Soil Mix: A mix of peat moss, perlite, and vermiculite is a common choice.
- Coco Coir: Coco coir is a sustainable alternative to peat moss that retains moisture well.
- Sand: Coarse sand provides excellent drainage.
- Water: Some people successfully root papaya cuttings in water, though this method can be less reliable.
Regardless of the medium you choose, it's crucial that it's sterile to prevent fungal diseases. You can sterilize soil by baking it in the oven at 200°F (93°C) for about 30 minutes. Before planting, moisten the rooting medium thoroughly but avoid making it soggy. Using a pencil or dibber, create a hole in the medium and gently insert the cutting, ensuring that the wounded and hormone-treated portion is buried. Press the soil around the cutting to provide support and eliminate air pockets. Aim to plant the cutting about 2-3 inches deep.
Here's a table summarizing the pros and cons of different rooting media:
| Rooting Medium | Pros | Cons |
|---|---|---|
| --- | --- | --- |
| Peat Moss/Perlite/Vermiculite | Good water retention, aeration, sterile | Peat moss is not sustainable |
| Coco Coir | Sustainable, good water retention, aeration | Can be expensive |
| Sand | Excellent drainage, inexpensive | Dries out quickly, less nutrient retention |
| Water | Easy to monitor root growth | Roots can be brittle, less oxygen |
Creating the Ideal Environment for Rooting Papaya Cuttings
Papaya cuttings need a warm, humid environment to encourage root development. Here's how to create that environment:
- Humidity: High humidity prevents the cuttings from drying out. You can achieve this by using a humidity dome, plastic bag, or misting the cuttings regularly.
- Temperature: Aim for a temperature between 70-80°F (21-27°C). A heat mat can help maintain a consistent temperature, especially in cooler climates.
- Light: Provide bright, indirect light. Avoid direct sunlight, which can scorch the cuttings.
- Air Circulation: Some air circulation helps to prevent fungal diseases. If using a humidity dome, open it periodically to allow for air exchange.
Think of the environment you're creating as a mini-greenhouse. The goal is to trap moisture and heat around the cuttings, creating the perfect conditions for root growth. However, it's also important to strike a balance. Too much humidity without adequate air circulation can lead to fungal problems, which can quickly kill your cuttings. Regularly check the cuttings for any signs of mold or rot. If you see any, remove the affected cutting immediately and improve air circulation.
I have a friend who struggled with rooting papaya cuttings until he started using a DIY humidity dome. He took a clear plastic storage bin, poked a few holes in the top for ventilation, and placed his cuttings inside. He also used a small USB-powered fan to circulate the air. His success rate skyrocketed!
Caring for Papaya Cuttings While Rooting
Patience is key during the rooting process. It can take several weeks, or even months, for papaya cuttings to develop roots. Here's how to care for them during this time:
- Watering: Keep the rooting medium consistently moist, but not soggy. Water gently to avoid disturbing the cuttings.
- Misting: Mist the cuttings regularly to maintain high humidity.
- Ventilation: If using a humidity dome or plastic bag, open it regularly to allow for air exchange.
- Observation: Monitor the cuttings for any signs of disease or pest infestation. Remove any affected cuttings immediately.
- Avoid Fertilizing: Do not fertilize the cuttings until they have developed roots.
One of the biggest mistakes people make is overwatering. Soggy soil deprives the roots of oxygen and creates an environment conducive to fungal diseases. A good rule of thumb is to water only when the top inch of the rooting medium feels dry to the touch. When you do water, use a gentle spray bottle or watering can to avoid disturbing the cuttings. Also, avoid the temptation to tug on the cuttings to check for roots. This can damage any developing roots and set back the rooting process.
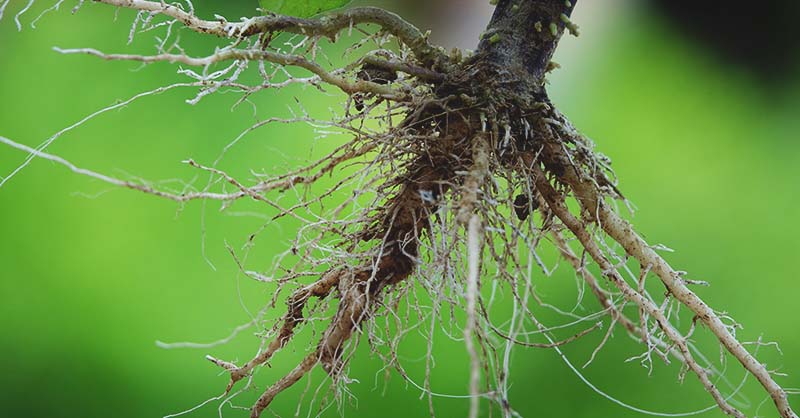
Checking for Root Development
After a few weeks, you can gently check for root development. Here's how:
- Gentle Tug Test: Gently tug on the cutting. If you feel resistance, it means roots have started to form.
- Visual Inspection: If possible, gently remove the cutting from the rooting medium and inspect the roots. Be careful not to damage them.
Remember, it's okay if the roots are small and delicate. The important thing is that they are present. Once the cuttings have developed a good root system, they are ready to be transplanted into individual pots.
Transplanting Rooted Papaya Cuttings
Once your papaya cuttings have developed a healthy root system, it's time to transplant them into individual pots. Here's how to do it:
- Potting Mix: Use a well-draining potting mix that's rich in organic matter.
- Pot Size: Choose a pot that's slightly larger than the root ball.
- Planting Depth: Plant the cutting at the same depth it was growing in the rooting medium.
- Watering: Water thoroughly after transplanting.
- Fertilizing: After a few weeks, you can start fertilizing the papaya plants with a balanced fertilizer.
Be extra careful when handling the rooted cuttings during transplanting. The roots are still fragile and can be easily damaged. Gently tease the roots apart before planting them in the new pot. After transplanting, provide the papaya plants with plenty of sunlight and water. Gradually acclimate them to outdoor conditions before planting them in the ground. With proper care, your rooted papaya cuttings will grow into healthy, fruit-bearing trees!
This process may require kneeling, which can be tough on the knees. For a more comfortable gardening experience, consider using the KVR Upgraded Garden Kneeler and Seat with Thicken & Widen Soft Kneeling Pad, also known as a heavy duty foldable gardener stool with 2 tool pouches! This gardening equipment can make your time working with papaya cuttings much easier. You can find this kneeler at https://amzn.to/4mhl Mx I.
Rooting papaya cuttings takes time and patience, but it’s a rewarding experience. By following these steps and providing your cuttings with the right environment, you can successfully propagate new papaya plants and enjoy the delicious fruits of your labor.